*Watch out for rocks
Things to bring:
- Oars
- Spool of Barbed Wire
-If anybody has any other tips to add, just mention them in the comments and I'll put them up here!!
Cheers and happy rafting!!!!!!!111
[update 10Aug'11]
Watched an episode of MacGyver that originally aired November 10th, 1985 called Trumbo's World.
There is a short sequence where the 'Gyv rescues this lady and jumps into a river raft from a rope that he sets on fire. He throws a spool of barbed wire in with them and pushes off, kindly leaving a second raft on shore for the 6 pursuers to give chase in. Mac and the woman make fine work of the river and are able to jump onto some rocks and rig up a line of barbed wire across the river and continue on. The 6 guys in the other raft totally hit the wire and flip over.
The rest of the episode goes in a completely different direction, billions of ants killing everybody, tons of close up ant shots and a makeshift flamethrower. I think I learned how to make two different kinds of bombs this episode too.
Showing posts with label dubstep. Show all posts
Tuesday, August 9, 2011
Saturday, June 18, 2011
2005 Subaru Outback AUX-IN Hack Via Radio Module
Single CD (no 6CD changer) Manual Climate Control
MODEL NO. 86201AG64A
Manufactured June 2004 by Matsushita in Japan
I believe that the 2005 and 2006 Legacy and Outback had the same stereo, so this mod should work for them as well.
I'm going to be spending quite a bit of time on the road for an upcoming vacation and wanted to be able to plug in my own audio without spending a lot of money on a replacement faceplate and new head unit. The CD player had previously stopped reading/ejecting discs so if I could not do this mod I would be be listening to static filled radio the entire trip... *horror*
If you have a functioning CD player and don't want to solder anything I would recommend the JazzyMT mod which you plug in to the ribbon that connects the CD player to the mainboard. A CD that plays silence is needed for the JazzyMT aux input board.
If you don't mind soldering small things on a circuit board, don't want to spend much and would rather not have a CD spinning when you listen to your iPod, read on!
First remove the radio!
I found this youtube video very helpful when removing the radio:
http://www.youtube.com/watch? v=g_wmPo91kIM I first had to remove the chrome trim around the automatic transmission stick using a screwdriver with some tape on the end (to prevent scratching) which is not shown in the video.
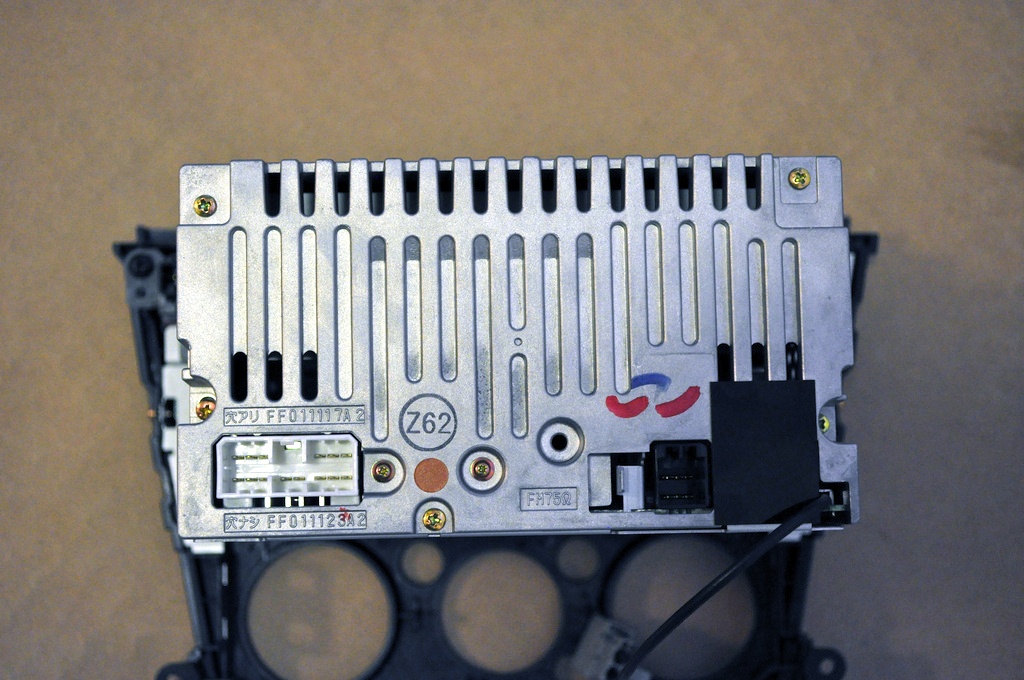
Back of the stereo, I mainly took these pictures so that I'd be able to see how it all went back together!
Model No. and other information.
Removing more screws
Front faceplate removed showing control/display circuit board.
More screws removed and CD ribbon disconnected and we can finally see the main circuit board.
I was inspired by a great post by Jordan found via Hack-a-Day about doing this to an older '04 Subaru stereo, it helped me locate the radio module and begin searching for the audio interface.
To find the Left and Right interface I hooked the mainboard and faceplate back up in the car and turned the radio on. A Zune was playing audio and hooked up to a couple wires via the 3.5mm interface below. I held the ground wire to the casing and touched each leg of the radio module with the audio out wire until I heard sweet crystal clear audio from the Zune coming out of the car speakers... well it was still mixed with the FM signal, but we'll fix that soon!
As you can see in the the above picture, I've used a sharpie on the two legs that output audio from the radio module to the mainboard, Red for Right and Blue for Left.
Underside of the mainboard at the radio module area. I did not see a good way to patch in here.

Diagram of which audio wires connect to where.
The Left and Right radio output legs were carefully clipped and bent outwards.
Be extremely gentle and use a low heat solder to attach these two wires. I felt one of the legs loosen from the radio module when I was applying heat to it and I have no idea how hard it would be to reattach if it detached completely.
Important: It is not shown here, but I also soldered the ground wire to that blob of solder on top of the radio module.
The Aux input wires are soldered to the underside of the mainboard. I placed some electrical tape over the nearby capacitors and used hot glue to hold the wires in place.
The stereo re-assembled and ready for final soldering to connect 3.5mm jack. I marked the wires from the radio module with sharpie so I would be able to tell them apart. (I only had 3 colors of wire!) Also, may I draw your attention to the can tab which I used as a washer to hold the wires in place as they exit the main assembly :)
I hand drilled a hole for the 3.5mm jack into the back of the cubby above the stereo and quickly found out that the plastic there was just a bit too thick to fasten the jack. I had to use a 1/2" spade drill bit to carve out a circle of plastic from the front. I could have taken the entire cubby out and thinned it from the back if I wanted it to be a bit cleaner look.
Update: I recommend choosing a different location to put the plug, it is fairly tedious to insert the jack into the back of such a small compartment!
MODEL NO. 86201AG64A
Manufactured June 2004 by Matsushita in Japan
I believe that the 2005 and 2006 Legacy and Outback had the same stereo, so this mod should work for them as well.
I'm going to be spending quite a bit of time on the road for an upcoming vacation and wanted to be able to plug in my own audio without spending a lot of money on a replacement faceplate and new head unit. The CD player had previously stopped reading/ejecting discs so if I could not do this mod I would be be listening to static filled radio the entire trip... *horror*
If you have a functioning CD player and don't want to solder anything I would recommend the JazzyMT mod which you plug in to the ribbon that connects the CD player to the mainboard. A CD that plays silence is needed for the JazzyMT aux input board.
If you don't mind soldering small things on a circuit board, don't want to spend much and would rather not have a CD spinning when you listen to your iPod, read on!
First remove the radio!
I found this youtube video very helpful when removing the radio:
http://www.youtube.com/watch?
Back of the stereo, I mainly took these pictures so that I'd be able to see how it all went back together!
Model No. and other information.
Removing more screws
Front faceplate removed showing control/display circuit board.
More screws removed and CD ribbon disconnected and we can finally see the main circuit board.
I was inspired by a great post by Jordan found via Hack-a-Day about doing this to an older '04 Subaru stereo, it helped me locate the radio module and begin searching for the audio interface.To find the Left and Right interface I hooked the mainboard and faceplate back up in the car and turned the radio on. A Zune was playing audio and hooked up to a couple wires via the 3.5mm interface below. I held the ground wire to the casing and touched each leg of the radio module with the audio out wire until I heard sweet crystal clear audio from the Zune coming out of the car speakers... well it was still mixed with the FM signal, but we'll fix that soon!
As you can see in the the above picture, I've used a sharpie on the two legs that output audio from the radio module to the mainboard, Red for Right and Blue for Left.
Underside of the mainboard at the radio module area. I did not see a good way to patch in here.

3.5mm interface
http://www.radioshack.com/product/index.jsp?productId=2103451#
Edit: Apparently the Radioshack link does not work, here is a similar product from Digikey:
http://www.digikey.com/product-detail/en/35RAPC4BH3/SC1464-ND/1288781
A good search to find it in other places is: "3.5mm switched jack stereo audio 5 contacts"
There are only 3 wires shown in this picture, but there will be 5 when it is finally installed.
Edit: Apparently the Radioshack link does not work, here is a similar product from Digikey:
http://www.digikey.com/product-detail/en/35RAPC4BH3/SC1464-ND/1288781
A good search to find it in other places is: "3.5mm switched jack stereo audio 5 contacts"
There are only 3 wires shown in this picture, but there will be 5 when it is finally installed.
Diagram of which audio wires connect to where.The Left and Right radio output legs were carefully clipped and bent outwards.
Be extremely gentle and use a low heat solder to attach these two wires. I felt one of the legs loosen from the radio module when I was applying heat to it and I have no idea how hard it would be to reattach if it detached completely.
Important: It is not shown here, but I also soldered the ground wire to that blob of solder on top of the radio module.
The Aux input wires are soldered to the underside of the mainboard. I placed some electrical tape over the nearby capacitors and used hot glue to hold the wires in place.
The stereo re-assembled and ready for final soldering to connect 3.5mm jack. I marked the wires from the radio module with sharpie so I would be able to tell them apart. (I only had 3 colors of wire!) Also, may I draw your attention to the can tab which I used as a washer to hold the wires in place as they exit the main assembly :)
I hand drilled a hole for the 3.5mm jack into the back of the cubby above the stereo and quickly found out that the plastic there was just a bit too thick to fasten the jack. I had to use a 1/2" spade drill bit to carve out a circle of plastic from the front. I could have taken the entire cubby out and thinned it from the back if I wanted it to be a bit cleaner look.
Everything works great! To use the Aux-In I just switch on the radio to FM. When the plug is inserted to the 3.5mm jack the radio audio cuts out and the audio from my device is played through the speakers instead.
Disclaimer: I am not responsible for any damage that arises from people attempting to replicate this hack, there are many things that could go wrong and I have not described every single step in detail. It is up to you to decide if you have the expertise to undertake this project.
Thanks to http://www.subaruoutback.org/forums/ for having a ton of info available while I was researching this project.
Cheers and good luck!!
Tuesday, May 11, 2010
Amazing Generic Pudding Box Scans from 1990s
So a friend of mine was getting rid of a food cache and I found some great vintage pudding boxes expiring in 1997 and 1998!!
I scanned them in at 600dpi using my crap HP "multifunction" device which is currently only able to scan, the PNGs were fucking huge so I made them into jpegs.
On with the show...
First up we have HY*TOP premium quality Lime Flavor Gelatin Dessert!!!
Feast your eyes because back in '94 you could get these for 50 cents... each!
I really like lime stuff.
It's astounding:

Next is a really obscure rarity. I'll bet nobody has ever collected this one.
Could you believe Food Club SENSIBLES FAT FREE pudding & pie filling Instant Vanilla Artificial Flavor!!!!???

I really like how the "I" in Sensibles is smaller, it really shows how much thought was put into this line of generic pudding.
This looks like it expired 08 19 98, it was also produced in skokie, illinois... just like those Quartet whiteboards.
So yeah, I have these original boxes available until this thursday when the recycling truck will pick them up. [update: gone]
I scanned them in at 600dpi using my crap HP "multifunction" device which is currently only able to scan, the PNGs were fucking huge so I made them into jpegs.
On with the show...
First up we have HY*TOP premium quality Lime Flavor Gelatin Dessert!!!
Feast your eyes because back in '94 you could get these for 50 cents... each!
I really like lime stuff.
It's astounding:

Next is a really obscure rarity. I'll bet nobody has ever collected this one.
Could you believe Food Club SENSIBLES FAT FREE pudding & pie filling Instant Vanilla Artificial Flavor!!!!???

I really like how the "I" in Sensibles is smaller, it really shows how much thought was put into this line of generic pudding.
This looks like it expired 08 19 98, it was also produced in skokie, illinois... just like those Quartet whiteboards.
So yeah, I have these original boxes available until this thursday when the recycling truck will pick them up. [update: gone]
Subscribe to:
Posts (Atom)
all the entries
- Nov 18 (1)
- Aug 25 (1)
- Dec 12 (1)
- Jul 14 (1)
- Dec 17 (1)
- Jun 20 (1)
- May 18 (1)
- Jul 21 (1)
- Apr 11 (1)
- Sep 14 (1)
- Jan 09 (1)
- Oct 23 (1)
- Aug 09 (1)
- Jun 03 (1)
- Mar 18 (1)
- Aug 09 (1)
- Jul 14 (1)
- Jun 18 (1)
- Jun 07 (1)
- May 11 (2)
- Oct 15 (1)
- Feb 06 (1)
- Jan 26 (1)
- Jan 24 (2)
- Jan 16 (2)
- Jan 07 (1)
- Apr 13 (1)
- Apr 10 (2)