Monday, May 18, 2015

Add a Front Center Pull Brake to Vintage Bicycle

I have a vintage "Derby" brand single speed coaster brake bicycle with metal fenders.  It was probably made in the 60s or 70s and sold by Pep Boys. The design is similar to the classic Schwinn Speedsters of the same era.


I really like the bike but have a hard time trusting the chain during downhill braking, so I wanted to add a front brake.

Hopefully this will help people who are wanting to add a front brake to their vintage bicycles.


First make sure there is a mounting hole for the brake on the fork. You can tell this model was designed for a brake by the hole and also the indentation in the fender.
Get the parts you will need from a used parts shop, I got all the items from the Recycled Cycles Fremont location in Seattle for about $20.

Center Pull Brake [bolt, 2 spacers, pads]

Make sure the brake fits over your fenders and that the pads touch the metal part of the rim when closed.  I happened to find a "Center Pull" style brake that fit.  If you find a side pull style you won't need the Cable Carrier or Cable Hanger, just a longer Cable Housing.

Cable Carrier

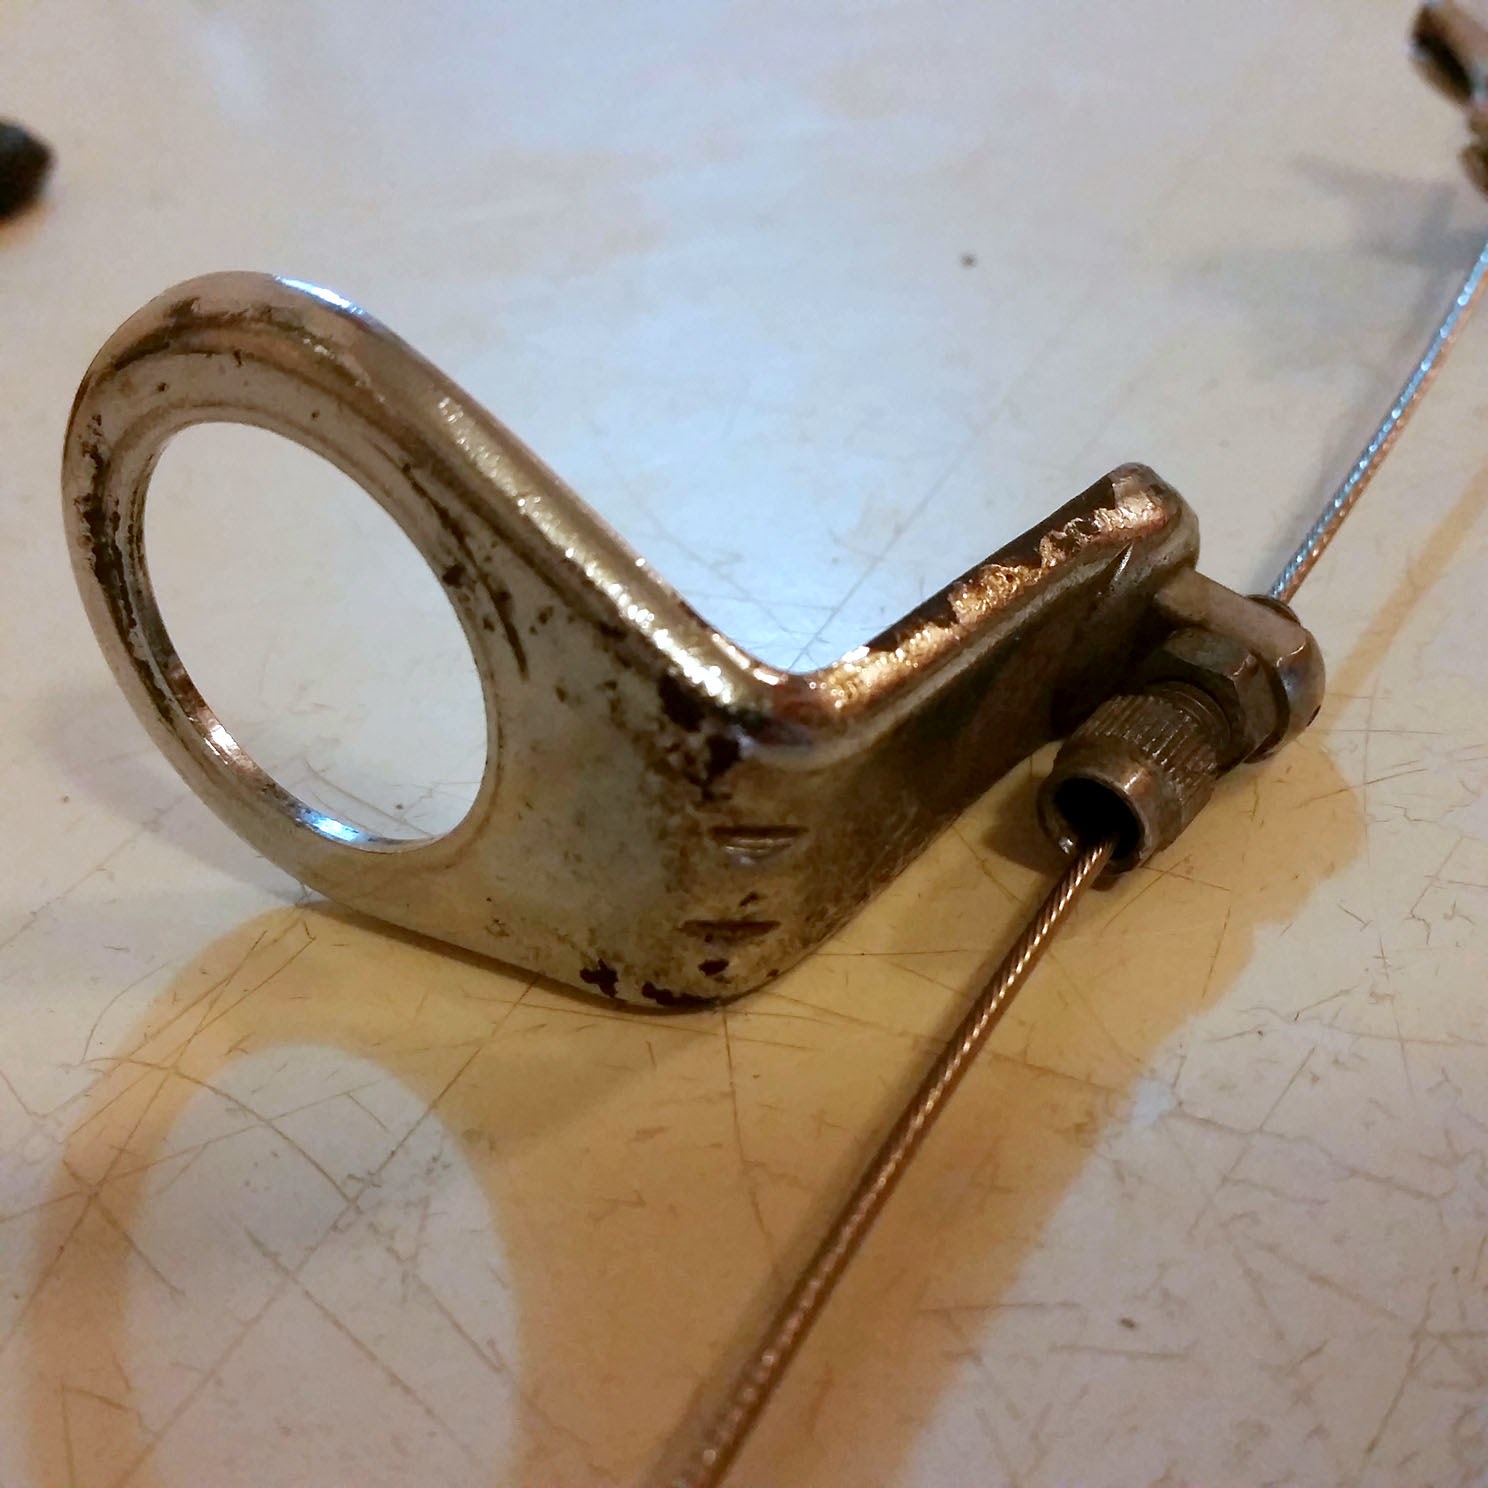
Cable Hanger

Brake Lever - Make sure this will fit on your handlebar, I'm not sure if there are different sizes.
 Brake Cable
 Brake Cable Housing and Ferrules - I used 1.5 feet for this project.

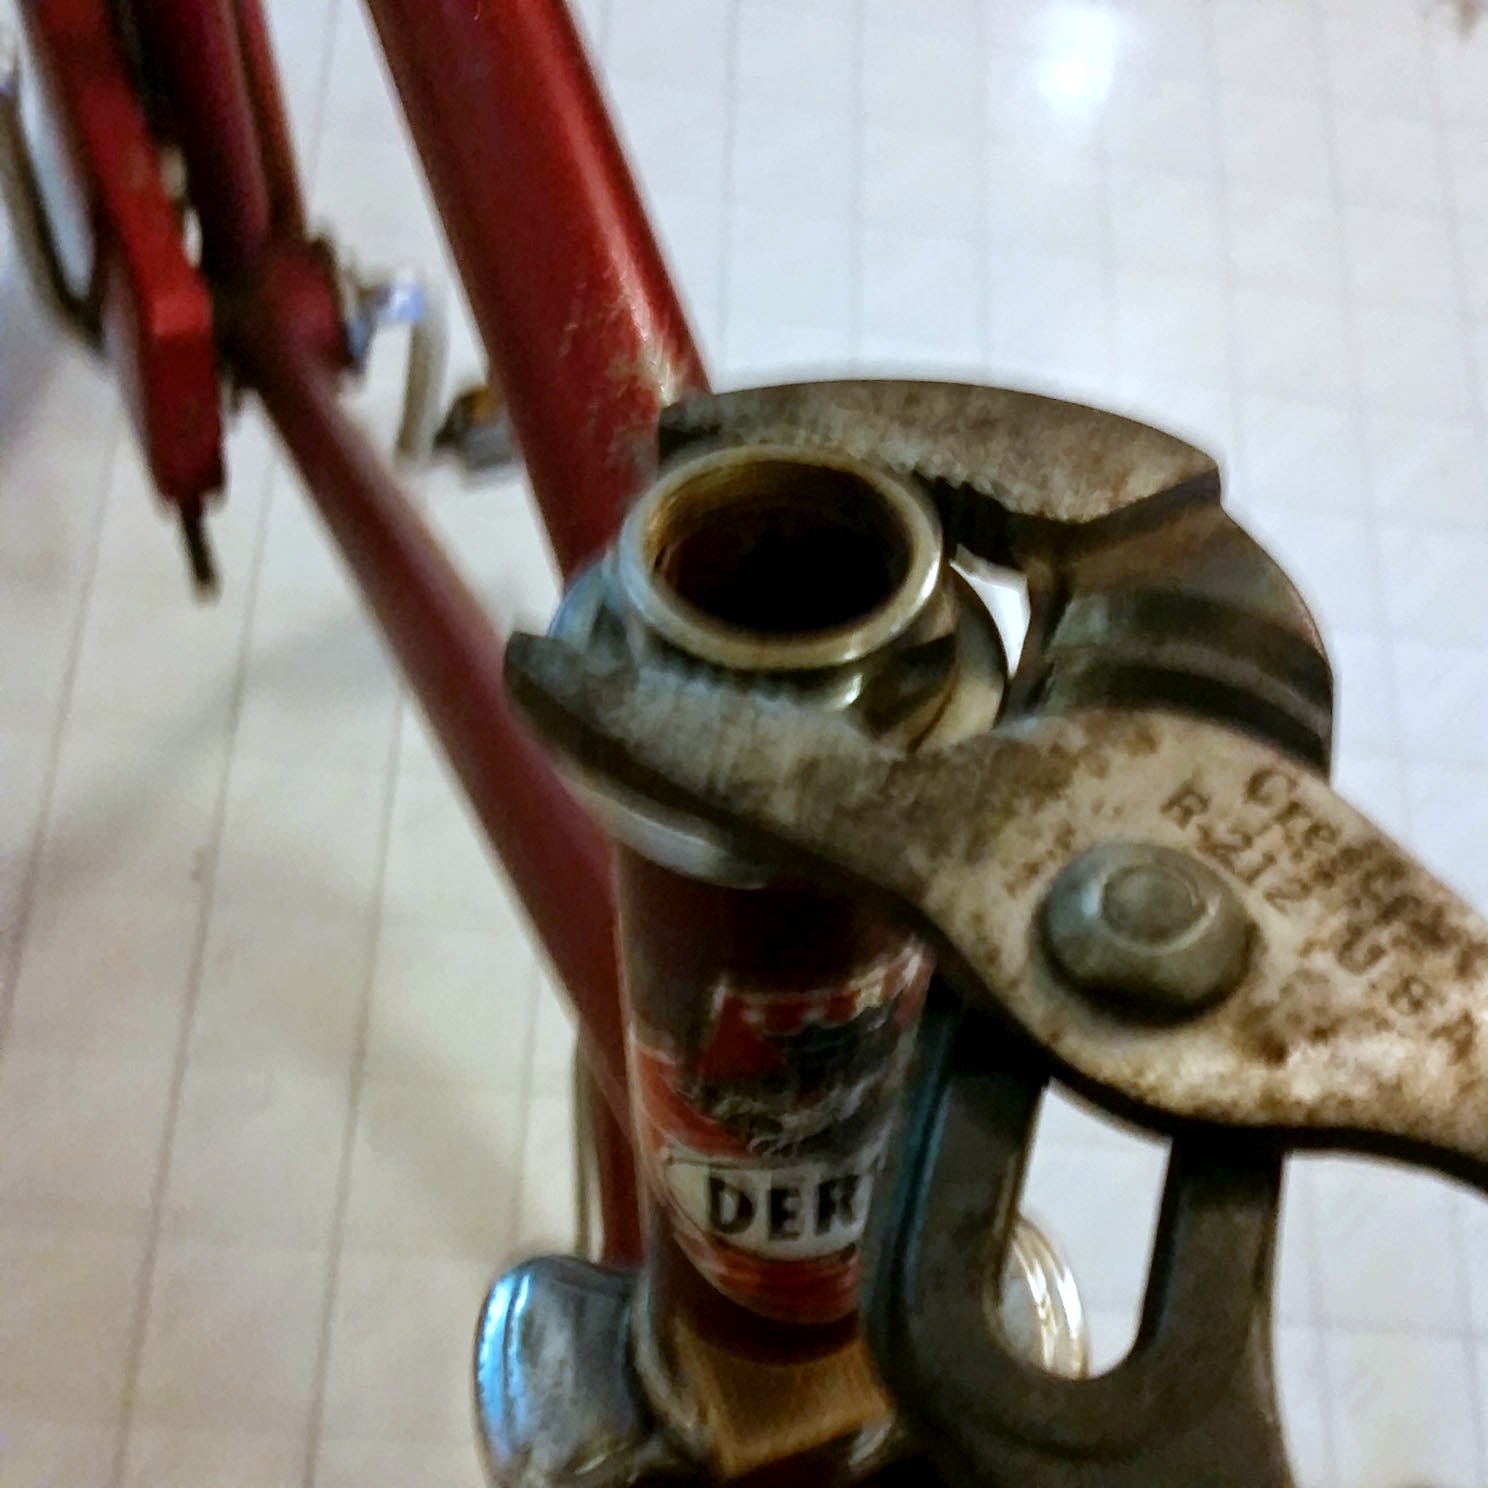
To install the cable hanger you have to remove the handlebars. (only necessary for center pull style brake)

Unscrew the top bolt between the handlebars a few turns and give it a firm downward tap to remove the handlebar stem.

 Remove the top Lock Nut.

 Insert the Cable Hanger then reverse the process to reattach the handlebars.

Attach the Brake
I think I lucked out with these two spacers because they fit perfectly under the small chromed flange on the front and back. 

 Push the brake through the hole.
 Attach and tighten the bolt.
Remove the handlebar grip by twisting and pulling, attach the brake lever and tighten in desired position.
 Insert cable into ferrule and cable housing then install in brake lever.
Route cable housing and cable around handlebars and through the cable hanger.
Push cable through the bolt in the cable carrier and tighten. 
 I found that the best way to tighten the cable carrier bolt was to pull the cable out towards the front while holding the brakes closed then tighten.

Give a some good squeezes on the brake lever and do some test braking to stretch the cable out. Afterwards adjust the cable carrier bolt to take up the slack. 
Et voilà, celebrate with a beverage!

Bonus images found around the web showing the most info I was able to find on this model.


Monday, July 21, 2014

Bear with Ragged Staff Brass Corkscrew

Warrikshire (Warwickshire)
http://en.wikipedia.org/wiki/Warwickshire
Birthplace of William Shakespeare

Bear with Ragged Staff


Brass Figural Finger Pull Corkscrew
Chained bear scratching tree stump
England
~1930s

Friday, April 11, 2014

Installing Arduino & Teensyduino on Ubuntu 14.04 (Trusty Tahr)

I have a Teensy 3.1 and a laptop running Ubuntu 14.04.

The Teensy website recommends using the Arduino software from http://arduino.cc/en/Main/Software instead of the repository (apt-get) presumably because the repository is out of date.

First I downloaded the Linux 32-bit version of Arduino 1.0.5 and extracted the folder to my Desktop.

I tried to run the "arduino" script in the folder but it failed with a java not found error.

drwxr-xr-x  8 --  4096 May 17  2013 .
drwxr-xr-x  3 --  4096 Apr 11 18:25 ..
-rwxr-xr-x  1 --   444 May 17  2013 arduino
drwxr-xr-x 13 --  4096 May 17  2013 examples
drwxr-xr-x  4 --  4096 May 17  2013 hardware
drwxr-xr-x  3 --  4096 May 17  2013 lib
drwxr-xr-x 18 --  4096 May 17  2013 libraries
drwxr-xr-x  3 -- 20480 May 17  2013 reference
-rw-r--r--  1 -- 37903 May 17  2013 revisions.txt
drwxr-xr-x  3 --  4096 May 17  2013 tools


*@*-Latitude-D810:~/Desktop/arduino-1.0.5$ ./arduino


./arduino: 22: ./arduino: java: not found


Ok, fair enough. Ubuntu must not have any java libs installed by default.

I found this nice stackoverflow question that deals with the dependencies required by the arduino IDE.

openjdk-6-jre is java
avr-libc and gcc-avr are c++ compiler libraries for working with atmel processors

Install all three by opening a terminal window and typing:

sudo apt-get install openjdk-6-jre avr-libc gcc-avr

168 megabytes of downloading and installing later you should be able to run the Arduino IDE using the terminal and typing "./arduino" in the folder you extracted to the desktop.


Wouldn't it be nice if you could double click the "arduino" icon (shell script) in the folder and have it run the IDE without using the command line every time?


Open a file explorer window and choose Edit>Preferences


From the "Behavior" tab select either "Run executable text files when they are opened" or "Ask each time"


Now you will be able to double click the "arduino" icon and have the script automatically execute.


Now we need to get the Arduino IDE working with the Teensy 3.1.

PJRC (maker of the teensy) has an explanation of how to install their add-on to the Arduino IDE called "Teensyduino" here.

I'm going to take you through the process step by step.

Download the Linux Installer (32 or 64-bit) from PJRC.

Once downloaded you have to change the file to be executable.
Right click on "teensyduino.32bit" (or 64bit) and choose "Properties"


 Check the "Allow executing file as program" box.

Now you should be able to double click on the "teensyduino.32bit" (or 64bit) icon and the installer will run.

Select the Arduino IDE folder and the "Next" button should activate.


Click "Next" then choose all the support libraries you want to install. I usually just install all of them.


Next we install the "udev-rules" from PJRC which let us send programs to the Teensy over the USB connection.

Save the "Linux udev rules" file to your computer from the PJRC website.


 Open the terminal again and go to where you downloaded the file and copy it to /etc/udev/rules.d/

*@*-Latitude-D810:~$ cd Downloads
*@*-Latitude-D810:~/Downloads$ ls
49-teensy.rules  arduino-1.0.5-linux32.tgz  teensyduino.32bit

*@*-Latitude-D810:~/Downloads$ sudo cp 49-teensy.rules /etc/udev/rules.d/


Now that the Teensy libraries are installed we need to start up the Arduino IDE and select the Teensy 3.1 as our development board.

Open the Arduino IDE and choose Tools>Board>Teensy 3.1


If all the above steps have been completed you should be able to plug in your Teensy 3.1 to a USB port and upload a sketch.

Saturday, September 14, 2013

HTML 5 Bezier Curves

I've created a display not unlike the classic windows os screensaver via HTML 5.
For more examples visit http://punchafoo.com/bezier/

Wednesday, January 9, 2013

Stumbling my way to "Hello World" on OUYA

DISCLAIMER:
This entire blog post is a work of art and not an actual guide.

Please refer to other, more knowledgeable sources if you are actually interested in developing apps on OUYA.

Here are some good places to start:

First off, the official OUYA Developer Portal:
https://devs.ouya.tv/developers

The official ODK forum:
http://forums.ouya.tv/categories/odk

A nice set of youtube videos by metaPhx describing getting AndEngine and a Nexus 7 working:
http://www.reddit.com/r/ouya/comments/16dwra/potential_devs_i_created_an_uptodate_complete/


Developing an OUYA app from absolute zero knowledge of programming for Android or OUYA!


Downloaded and extracted the following to C:\OUYA-dev\

odk-0.0.4.zip
adt-bundle-windows-x86.zip
eclipse-mobile-juno-SR1-win32.zip http://eclipse.org/mobile/

Followed this tutorial about creating an android project from scratch:
http://developer.android.com/training/basics/firstapp/creating-project.html

Start Eclipse:


Install ADT Plugin
http://developer.android.com/sdk/installing/installing-adt.html

Realize the adt-bundle already came with eclipse :)
oh well.

Not sure what I've gotten myself into!
Click New
"Use the Android API Level 16 (Android 4.1 "Jelly Bean") when developing for the OUYA Console."
https://devs.ouya.tv/developers/docs/setup

Created a new Android Virtual Device in eclipse... started with Galaxy Nexus because it has high resolution.

Started the emulator, waited for jellybean to boot. (had a memory allocation error so I reduced the virtual device RAM to 512MB)
Unlocked the emulated device and chose to run my app from eclipse...
(You can see I also dragged a checkbox into my app)

If I click the android app button in the emulator I can see my awesome creation sitting there!


Now I have to figure out how to incorporate the OUYA sdk files... this looks like some work.

from ouya.tv:
In order to use the OUYA API you will need to include ouya-sdk.jar in your project libraries, as well as guava-r09.jar and commons-lang-2.6.jar. These can be found in the libs directory. 

Need to figure out how to include these jars in my project...

Since I don't know what I'm doing I just dragged the files over the "libs" folder on the left side of the eclipse interface and chose to copy the libraries into my project.

Okie doke... there they are


Yeah, so I'm not sure what to do so I'm just going to try to create the OUYA virtual device.

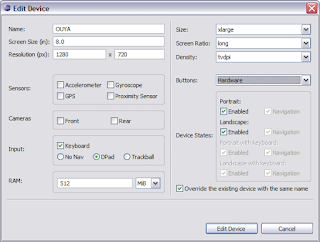
Opened the Android Virtual Device Manager and chose the Device Definitions tab, clicked "New Device" button:
from ouya.tv:
Emulator
If using the emulator, configure the Android virtual device as follows:
  • Resolution: 1920x1080 or 1280x720, as desired
  • Hardware Back/Home keys: yes (you will need to add this to the hardware parameters)
  • D-Pad support: yes (you will need to add this to the hardware parameters)
  • Target: Android 4.1 - API Level 16
  • CPU/ABI: Intel Atom x86
  • Device RAM size: 1024
Only 512 RAM because of the previous error I had.

Wow... I realize I've probably created the worst tutorial for anything, ever. Sorry.

Since I want to install some APKs via adb onto the emulator I had to add the android SDK directories to my PATH variable in Windows XP.


C:\OUYA-dev\adt-bundle-windows-x86\sdk;C:\OUYA-dev\adt-bundle-windows-x86\sdk\tools;C:\OUYA-dev\adt-bundle-windows-x86\sdk\platform-tools

soooo...  now I should be able to easily install the ouya-launcher.apk via adb.

apparently the path variable isn't immediately updated :(
Oh well, still able to just use the full paths.

C:\OUYA-dev\adt-bundle-windows-x86\sdk\platform-tools>adb install C:\OUYA-dev\OUYA-ODK\ouya-launcher.apk

All right! Now what? There appears to be a timer and a stopwatch if you arrow left or right?

may as well install teh ouya-framework.apk
C:\OUYA-dev\adt-bundle-windows-x86\sdk\platform-tools>adb install C:\OUYA-dev\OUYA-ODK\ouya-framework.apk

OK, hit escape to get out of the stopwatch thing, not sure why it chose to run that. Found the OUYA launcher in the app list and launched that. success!

I feel like a damn wizard at this point, even though I know I've barely scratched the surface.
Down arrow to "skip pairing" and it's the Julie Uhrman video, plays like a slideshow on my computer.


 Now it's just stuck at the Contacting OUYA servers... screen :(

 Apparently if you wait about 5 minutes it times out, yay!

 Well, I don't have the buttons configured correctly so I'm stuck on this screen, time to restart the emulator
Update: actually I wasn't stuck, you can click on the little round buttons using the mouse.
Changed some settings to the AVD anyway


 Chose menu - devs - software... hmmm my app isn't there... oh yeah... because I haven't ran it from eclipse yet.
Chose the "run configurations" from eclipse and changed the target to "always prompt" so it wouldn't try loading the Nexus AVD that I created earlier.

My app came up, I was able to hit escape and get back to the OUYA frontend, reload the "devs - software" menu and now I see it!


Runs like I don't know what I'm doing, showing the android menu bar and I'm not sure why I have a black border on the right side of the emulator. HELLO WORLD!


Tuesday, October 23, 2012

Coroplast Political Sign Twin Boom RC Airplane - V1

I have piloted the first successful flight of my experimental RC plane made from easily obtained parts.

Now I will share my creation so others may experiment with the design themselves.


Finished Product

Video of short successful flight into tree.
Control Demo Video

After crashing a balsa R/C airplane and contemplating the repair time, I decided I could make an entirely new airplane which would be much easier to repair in the event of unplanned ground contact.

There are quite a few resources out there for aspiring R/C builders:
The SPAD (Simple Plastic Airplane Design) Forum on rcgroups.com
http://www.rcgroups.com/spad-simple-plastic-airplane-designs-176/

SPAD to the Bone (their websites are a little scattered after they lost "spadtothebone.com")
http://spadtothebone.net/ or http://www.spadtothebone.org/ or http://spadworld.net/forum/

Ed's Experimental Airlines Youtube Channel - Dollar Tree Foamboard Planes
http://www.youtube.com/user/ExperimentalAirlines
A great source for cheap RC supplies
www.hobbyking.com

Design Constraints

  1. Wing made from one standard 18"x24" 4mm coroplast campaign sign.
  2. Tail attached using a standard 48" dowel, cut in half.
  3. Must work with my existing R/C setup (2 servos, ESC and LiPo Battery)

Having these constraints actually made the project a lot more fun for me and kept it from getting too expensive.

Supplies

Body
  1. One standard 18"x24" 4mm corrugated plastic campaign sign 
  2. Two 48" long,  0.21" diameter wooden dowels. (this is just the common size, for this project you only really need  two 24" and one 36" dowel)
    OPTIONAL - Two 48" long carbon fiber tubes instead (much stronger)
    OPTIONAL - Use arrow shafts, they are between 22 and 30" and you can sometimes find free ones
  3. One small plastic Odwalla bottle
  4. 4mm thick square piece of wood to fit in bottom of Odwalla bottle
  5. A bunch of zip ties
  6. Double sided foam tape

    Electronics/Control/Prop

  7. ESC (Electronic Speed Controller) (20 Amp)
  8. Electric Motor (1400kv Brushless Outrunner)
  9. Plastic Prop (10x9)
  10. Three metal pushrods w/ threaded ends and clevises (18"x2mm diameter)
  11. Three nylon control horns with screws
  12. Three linkage stoppers (or you can just bend the pushrods into the holes)
  13. Two servo arms
  14. Two servos (Futuba)
  15. Receiver (Futuba)
  16. Transmitter (Futuba)
  17. LiPo Battery (Zippy 2200 30C 3S)
  18. LiPo Charger/Balancer (Thunder AC6)
You will need to figure out how to hook the LiPo, ESC, Motor, Receiver, and Servos together yourself. I soldered old molex connectors to the LiPo and used a lamp power switch.


Overview


CAD diagram showing the main dimensions, structural components of the airplane, and proper orientation of corrugated fluting.

Here is a link to a PDF of the above diagram: https://www.dropbox.com/s/b6qhd1a3k055w8e/CampaignSignPlane4.pdf


Construction Directions

  • Cut wings and tail from campaign sign (you may be able to use just one sign if you are careful)
  • Cut two 24" dowels and one 36" dowel
  • Cut along top flute approx 1.5" back from leading edge of main wings
  • Bend leading edge up and back
  • Fasten the main wing together using the 36" dowel and zip ties
  • Fasten main wing back along centerline using zip ties, possibly adding a thin balsa rectangle for strength
  • Make elevator and ailerons by cutting wedges out from the sides and making hinges as shown below 
  • Tuck the 24" dowels under the 36" dowel
  • Fasten 24" dowels to wing and tail using zip ties
  • Cut a hatch from the Odwalla bottle
  • Place wood inside bottom of bottle
  • Fasten motor to wood using 4 screws through outside bottom of bottle, making sure it spins easily (you may need a spacer of some sort, depending on your motor)
  • Fasten bottle to main wing using zip ties
  • Screw control horns on to ailerons and elevator
  • Fasten the top wing elevator servo using zip ties
  • Fasten the under wing aileron servo using zip ties
  • Cut pushrods to appropriate sizes and attach clevises
  • Attach pushrods to servos and control horns
  • Fasten receiver and ESC using double stick tape/zip ties
  • Switch main power off, connect all electronics
  • Push LiPo battery into Odwalla bottle so that it will not come out in flight
  • Perform prop test in a safe environment so as not to cause damage/injury in event of failure
  • Calibrate servos
  • Fly!

Detail of a wire I added across top to keep the wing rigid

Detail of aileron and zip tie


Detail of elevator control horn and clevis

Vertical stabilizers added by cutting notches in tail and fins

Detail of motor mount

Odwalla bottle battery housing

Under wing aileron servo with protective bottle

Under wing aileron servo

Detail of under wing aileron control horn and clevis

Cutting Hinges into Corrugated Plastic

Because of the side to side orientation of the fluting I was able to create ailerons and an elevator without any additional hardware by carefully cutting the plastic along alternating flutes.

Use a knife or scissors to slice down the flutes, it is tricky at first, but goes smoothly once you get the hang of it.
CAD diagram of coro hinges


Thursday, August 9, 2012

Comparison of HPGL Viewers

A USB stick containing HPG files came across my desk again today, lets see how to best make use of this unique format.

HPGL or Hewlett Packard Graphics Language is a method of describing large 2D vector files using a small amount of data. This data is usually passed directly from a computer to an HP printer or plotter. The small file size and ease of creation prompted many companies to adopt policies which used HPGL files as a standard method of archiving or sharing drawings. Unfortunately, unless both you and your recipient have HP plotters and software, the file is not as useful.

Paul Bourke shared information on the format of the file in 1992. Bourke mentions that while the format is easy to read and write, there is plotter specific information embedded in each file which you would need documentation provided by HP to decode.

Usually all I want to do is convert the file to a PDF so it can be viewed and shared by others.


CERN currently has the best (only?) free option. Only recently was it made available for free to the public, it used to cost 800 Swiss francs (~830USD) per license for people outside of CERN!

hpglview-543 for Linux, Windows and OSX
http://service-hpglview.web.cern.ch/service-hpglview/download_index.html

(hopefully CERN keeps answering questions about the universe and will offer this long into the future)


And some paid options:

Swiftview has an eye toward the HPGL and PCL file format market with their Swiftview Viewer which has a 30 day trial (adds "unlicensed copy" text to output files) after which you would need to pay 295USD for a single user license.

Aphena makes an interesting software called Plottergeist which costs 99GBP and has no demo. Apparently you can use it in conjunction with a GPIB card to output files to an external instrument as if it was paper.


Sunday, June 3, 2012

Windows 8 RP on Latitude D810

I have successfully installed Windows 8 Release Preview Build 8400 on a Dell Latitude D810.

I initially was dual booting WinXP and Ubuntu12.04, used a gparted boot CD to add 20GB to the WinXP partition so Win8 would start the upgrade.

After downloading for a while the upgrader got an error initializing the install.
No problem, it was a long shot to upgrade from XP anyway.
Downloaded the ISO from Microsoft and created a boot DVD from the ISO using the Windows 7 USB/DVD Download Tool which worked great with an external DVD burner on XP.

Booted from the DVD and started the install.
The XP partition was FAT32 and apparently Win8 requires an NTFS partition.
Formatting the partition took only a few seconds and the installation went fine afterwards.

WiFi didn't work until after I plugged in Ethernet, so I'm not sure if Win8 was just slow to install the driver or needed to update something from the internet.

My sound was not working and my video and mouse were still running on generic drivers.

Audio from "Sigmatel C-Major Audio" working using "SIGMATEL STAC 975X AC97" release A03.5.10.04255 in the file R99254.EXE from the Dell drivers website. It does mention Vista-32bit compatibility in the description.

Video was a bit trickier. The Radeon X600 specific drivers from ATI (32bit Vista WDM Integrated Driver 36.7 MB 10.2 2/24/2010) would not detect the card, always leaving the generic driver in place with a stretched 1024x768 display.

I found this awesome tutorial (duplicated below) on forcing the drivers to install by altering the device ID in the driver .inf file. I changed my X600 line to the device ID shown in device manager and manually updated the video driver with that file.


Question
JuanPeñaR asked on  April 11, 2012
HOW TO SOLVE common screen resolution problem after instal windows 8
Hello people.
Do you have a low screen resolution after install windows 8?
Even you download appropriated drivers for your graphic card and it does not recognizes your device?
Does your windows 8 keep a Generic windows graphic drivers on your system?
Do you want to get your screen reach its appropriate resolution?
HERE IS THE SOLUTION:
1. Download your signed display card drivers and install it
2. Uninstall the generic display driver
3. Go to C:\windows\inf and look for display.inf file and rename it to display2.inf (it can be any other name to stuck the installation root by windows)
4. Open regedit and go to Computer\HKEY_LOCAL_MACHINE\System\ControlSet001\Services\BasicDisplay and delete it.
          DO NOT RESTART YOUR COMPUTER!!!!!!!!
5. Go to device manager console (right click on Computer, Manage, Device Manager, click on devices window and then click on Scan for hardware changes icon.
6. You will see your display card asking for drivers.
7. Right click on display card and go to hardware Ids on driver detail
8. Copy values. It must see like this: PCI\VEN_1002&DEV_5955&SUBSYS_3085103C&REV_00
9. Go to created directory by your signed driver installed (C:\ATI... C:\NVIDIA... C:AMD... etc.
10. Go to driver directory. for example: C:\ATI\10-02_legacy_vista32-64_dd_ccc\Packages\Drivers\Display\LH_INF and look for .inf file on it
11. Open the .inf file and go to Driver information block. It must see like this(for ATI graphics):

 ""Driver information
;
[Manufacturer]
%ATI% = ATI.Mfg, NTx86.6.0
[ATI.Mfg.NTx86.6.0]
"All-in-Wonder X1800XL" = ati2mtag_R520, PCI\VEN_1002&DEV_7109&SUBSYS_03221002
"All-in-Wonder X1800XL " = ati2mtag_R520, PCI\VEN_1002&DEV_7109&SUBSYS_04121002
"All-in-Wonder X1800XL Secondary" = ati2mtag_R520, PCI\VEN_1002&DEV_7129&SUBSYS_03231002
"All-in-Wonder X1800XL Secondary " = ati2mtag_R520, PCI\VEN_1002&DEV_7129&SUBSYS_04131002
"All-in-Wonder X1900" = ati2mtag_R580, PCI\VEN_1002&DEV_7249&SUBSYS_03221002
"All-in-Wonder X1900 " = ati2mtag_R580, PCI\VEN_1002&DEV_7249&SUBSYS_04121002
"All-in-Wonder X1900 Secondary" = ati2mtag_R580, PCI\VEN_1002&DEV_7269&SUBSYS_03231002
"All-in-Wonder X1900 Secondary " = ati2mtag_R580, PCI\VEN_1002&DEV_7269&SUBSYS_04131002
"ALL-IN-WONDER X600 Series" = ati2mtag_RV380x, PCI\VEN_1002&DEV_5B62&SUBSYS_44221002
"ALL-IN-WONDER X600 Series " = ati2mtag_RV380x, PCI\VEN_1002&DEV_5B62&SUBSYS_04221002
"ALL-IN-WONDER X600 Series Secondary" = ati2mtag_RV380x, PCI\VEN_1002&DEV_5B72&SUBSYS_44231002
"ALL-IN-WONDER X600 Series Secondary " = ati2mtag_RV380x, PCI\VEN_1002&DEV_5B72&SUBSYS_04231002
"ALL-IN-WONDER X800 Series" = ati2mtag_R420, PCI\VEN_1002&DEV_4A50&SUBSYS_44221002
"ALL-IN-WONDER X800 Series " = ati2mtag_R420, PCI\VEN_1002&DEV_4A4A&SUBSYS_44221002
"ALL-IN-WONDER X800 Series  " = ati2mtag_R420, PCI\VEN_1002&DEV_4A4B&SUBSYS_44221002
"ALL-IN-WONDER X800 Series - Secondary" = ati2mtag_R420, PCI\VEN_1002&DEV_4A70&SUBSYS_44231002
"ALL-IN-WONDER X800 Series Secondary" = ati2mtag_R420, PCI\VEN_1002&DEV_4A6A&SUBSYS_44231002
"ALL-IN-WONDER X800 Series Secondary " = ati2mtag_R420, PCI\VEN_1002&DEV_4A6B&SUBSYS_44231002
"ALL-IN-WONDER X800 XL" = ati2mtag_R430, PCI\VEN_1002&DEV_554D&SUBSYS_03221002
"ALL-IN-WONDER X800 XL Secondary" = ati2mtag_R430, PCI\VEN_1002&DEV_556D&SUBSYS_03231002
"ATI Radeon X1050" = ati2mtag_RV370, PCI\VEN_1002&DEV_5B63&SUBSYS_30001002
"ATI Radeon X1050 " = ati2mtag_RV370, PCI\VEN_1002&DEV_5B60&SUBSYS_30001002
"ATI Radeon X1050  " = ati2mtag_RV350, PCI\VEN_1002&DEV_4153&SUBSYS_30001002
"ATI Radeon X1050   " = ati2mtag_RV360, PCI\VEN_1002&DEV_4152&SUBSYS_30001002
"ATI Radeon X1050 Secondary" = ati2mtag_RV370, PCI\VEN_1002&DEV_5B73&SUBSYS_30011002
"ATI Radeon X1050 Secondary " = ati2mtag_RV370, PCI\VEN_1002&DEV_5B70&SUBSYS_30011002
"ATI Radeon X1050 Secondary  " = ati2mtag_RV350, PCI\VEN_1002&DEV_4173&SUBSYS_30011002
"ATI Radeon X1050 Secondary   " = ati2mtag_RV360, PCI\VEN_1002&DEV_4172&SUBSYS_30011002
"ATI Radeon X1550" = ati2mtag_RV515, PCI\VEN_1002&DEV_7142&SUBSYS_30001002
"ATI Radeon X1550 " = ati2mtag_RV515, PCI\VEN_1002&DEV_7183&SUBSYS_30001002
"ATI Radeon X1550 Secondary" = ati2mtag_RV515, PCI\VEN_1002&DEV_7162&SUBSYS_30011002
"ATI Radeon X1550 Secondary " = ati2mtag_RV515, PCI\VEN_1002&DEV_71A3&SUBSYS_30011002
"ATI Radeon X1550 Series" = ati2mtag_RV515, PCI\VEN_1002&DEV_7146&SUBSYS_30001002
"ATI Radeon X1550 Series " = ati2mtag_RV515, PCI\VEN_1002&DEV_7187&SUBSYS_30001002
"ATI Radeon X1550 Series Secondary" = ati2mtag_RV515, PCI\VEN_1002&DEV_7166&SUBSYS_30011002
"ATI Radeon X1550 Series Secondary " = ati2mtag_RV515, PCI\VEN_1002&DEV_71A7&SUBSYS_30011002
"Radeon X1800 CrossFire Edition" = ati2mtag_R520, PCI\VEN_1002&DEV_7109&SUBSYS_0D021002
"Radeon X1800 CrossFire Edition Secondary" = ati2mtag_R520, PCI\VEN_1002&DEV_7129&SUBSYS_0D031002
"Radeon X1900 CrossFire Edition" = ati2mtag_R580, PCI\VEN_1002&DEV_7249&SUBSYS_0D021002
"Radeon X1900 CrossFire Edition Secondary" = ati2mtag_R580, PCI\VEN_1002&DEV_7269&SUBSYS_0D031002
"Radeon X1950 CrossFire Edition" = ati2mtag_R580, PCI\VEN_1002&DEV_7240&SUBSYS_0D021002
"Radeon X1950 CrossFire Edition Secondary" = ati2mtag_R580, PCI\VEN_1002&DEV_7260&SUBSYS_0D031002
"Radeon X800 CrossFire Edition" = ati2mtag_R430, PCI\VEN_1002&DEV_554D&SUBSYS_0D021002
"Radeon X800 CrossFire Edition Secondary" = ati2mtag_R430, PCI\VEN_1002&DEV_556D&SUBSYS_0D031002
"RADEON X850 CrossFire Edition" = ati2mtag_R480, PCI\VEN_1002&DEV_5D52&SUBSYS_0D021002
"RADEON X850 CrossFire Edition Secondary" = ati2mtag_R480, PCI\VEN_1002&DEV_5D72&SUBSYS_0D031002
"Asus Radeon X1050" = ati2mtag_RV350, PCI\VEN_1002&DEV_4153&SUBSYS_30001043
"Asus Radeon X1050 Secondary" = ati2mtag_RV350, PCI\VEN_1002&DEV_4173&SUBSYS_30011043
"ASUS Radeon X1550" = ati2mtag_RV515, PCI\VEN_1002&DEV_7142&SUBSYS_30001043
"ASUS Radeon X1550 " = ati2mtag_RV515, PCI\VEN_1002&DEV_7183&SUBSYS_30001043
"ASUS Radeon X1550 Secondary" = ati2mtag_RV515, PCI\VEN_1002&DEV_7162&SUBSYS_30011043
"ASUS Radeon X1550 Secondary " = ati2mtag_RV515, PCI\VEN_1002&DEV_71A3&SUBSYS_30011043
"ASUS Radeon X1550 Series" = ati2mtag_RV515, PCI\VEN_1002&DEV_7146&SUBSYS_30001043
"ASUS Radeon X1550 Series " = ati2mtag_RV515, PCI\VEN_1002&DEV_7187&SUBSYS_30001043
"ASUS Radeon X1550 Series Secondary" = ati2mtag_RV515, PCI\VEN_1002&DEV_7166&SUBSYS_30011043
"ASUS Radeon X1550 Series Secondary " = ati2mtag_RV515, PCI\VEN_1002&DEV_71A7&SUBSYS_30011043
"ASUS X550 Series" = ati2mtag_RV370, PCI\VEN_1002&DEV_5B60&SUBSYS_31001043
"ASUS X550 Series Secondary" = ati2mtag_RV370, PCI\VEN_1002&DEV_5B70&SUBSYS_31011043
"ATI Radeon X1050    " = ati2mtag_RV370, PCI\VEN_1002&DEV_5B63&SUBSYS_30001043
"ATI Radeon X1050     " = ati2mtag_RV370, PCI\VEN_1002&DEV_5B60&SUBSYS_30001043""

12. Look for your display card driver information and overwrite with your copied device id
for example:
If you have an ATI Radeon X1550 display card. so you must find it on the list:
-----"ATI Radeon X1550" = ati2mtag_RV515, PCI\VEN_1002&DEV_7142&SUBSYS_30001002-----
-----"ATI Radeon X1550 " = ati2mtag_RV515, PCI\VEN_1002&DEV_7183&SUBSYS_30001002-----
and overwrite when says with PCI\VEN_1002&DEV_7142&SUBSYS_30001002 with your device Id.
So now the .inf file will keep your device id information. like this:
"ATI Radeon X1550" = ati2mtag_RV515, PCI\VEN_1002&DEV_5955&SUBSYS_3085103C&REV_00
13. Save your .inf file (you must overwrite the original .inf file with the new information. so if you are denied for windows to save it. you can save as a copy and then rename it same as original file(after delete it of course)
14. Now go to your display card asking for drivers and click update driver, Browse my computer for driver software, click on browse button and go to folder where is located the new drivers. Then click next and new drivers will be installed
15. Remember click on "Install anyway" if windows security recommend don't install it.

I HOPE TO BE WELL EXPLAINED. SO IF YOU HAVE ANY QUESTION. PLEASE FEEL FREE TO ASK.

Regards.
Juan-


Boom! 1280x800 native resolution.

Installed the Alps Touchpad Driver 7.0.301.4 from http://drivers.softpedia.com/progDownload/Alps-Touchpad-Driver-703014-Download-24482.html and my side scrollers started working on the touchpad.


Would be great to hear if this is fixed in the retail release of Win 8!


Sunday, March 18, 2012

Fan

Here is a fan

Tuesday, August 9, 2011

White Water Rafting Tips

*Watch out for rocks

Things to bring:
- Oars
- Spool of Barbed Wire


-If anybody has any other tips to add, just mention them in the comments and I'll put them up here!!

Cheers and happy rafting!!!!!!!111

[update 10Aug'11]

Watched an episode of MacGyver that originally aired November 10th, 1985 called Trumbo's World.
There is a short sequence where the 'Gyv rescues this lady and jumps into a river raft from a rope that he sets on fire. He throws a spool of barbed wire in with them and pushes off, kindly leaving a second raft on shore for the 6 pursuers to give chase in. Mac and the woman make fine work of the river and are able to jump onto some rocks and rig up a line of barbed wire across the river and continue on. The 6 guys in the other raft totally hit the wire and flip over.

The rest of the episode goes in a completely different direction, billions of ants killing everybody, tons of close up ant shots and a makeshift flamethrower. I think I learned how to make two different kinds of bombs this episode too.

Thursday, July 14, 2011

ISO8.SHX AutoCAD Font / Typeface


I had a bit of trouble finding the nice looking iso8.shx on the web so I'm embedding it here.
These bits of text appear inside the binary file:
"AutoCAD-86 shapes 1.1" and
"ISO font extended by MENZI ENGINEERING C 1989"


iso8.shx

Right click iso8.shx above and choose save this link.
In the save dialog box change the file name from l9iXa7rJ.txt.part or whatever the default name is to iso8.shx
I had to place it in the C:\Program Files\AutoCAD 2005\Fonts\ folder on my machine, I think it is different for newer versions of AutoCAD.

This person seems to have it as well

all the entries

Mastodon