Thursday, July 14, 2011

ISO8.SHX AutoCAD Font / Typeface


I had a bit of trouble finding the nice looking iso8.shx on the web so I'm embedding it here.
These bits of text appear inside the binary file:
"AutoCAD-86 shapes 1.1" and
"ISO font extended by MENZI ENGINEERING C 1989"


iso8.shx

Right click iso8.shx above and choose save this link.
In the save dialog box change the file name from l9iXa7rJ.txt.part or whatever the default name is to iso8.shx
I had to place it in the C:\Program Files\AutoCAD 2005\Fonts\ folder on my machine, I think it is different for newer versions of AutoCAD.

This person seems to have it as well

Saturday, June 18, 2011

2005 Subaru Outback AUX-IN Hack Via Radio Module

Single CD (no 6CD changer) Manual Climate Control
MODEL NO. 86201AG64A
Manufactured June 2004 by Matsushita in Japan

I believe that the 2005 and 2006 Legacy and Outback had the same stereo, so this mod should work for them as well. 

I'm going to be spending quite a bit of time on the road for an upcoming vacation and wanted to be able to plug in my own audio without spending a lot of money on a replacement faceplate and new head unit. The CD player had previously stopped reading/ejecting discs so if I could not do this mod I would be be listening to static filled radio the entire trip... *horror*

If you have a functioning CD player and don't want to solder anything I would recommend the JazzyMT mod which you plug in to the ribbon that connects the CD player to the mainboard. A CD that plays silence is needed for the JazzyMT aux input board.

If you don't mind soldering small things on a circuit board, don't want to spend much and would rather not have a CD spinning when you listen to your iPod, read on!


First remove the radio!
I found this youtube video very helpful when removing the radio:
http://www.youtube.com/watch?v=g_wmPo91kIM I first had to remove the chrome trim around the automatic transmission stick using a screwdriver with some tape on the end (to prevent scratching) which is not shown in the video.
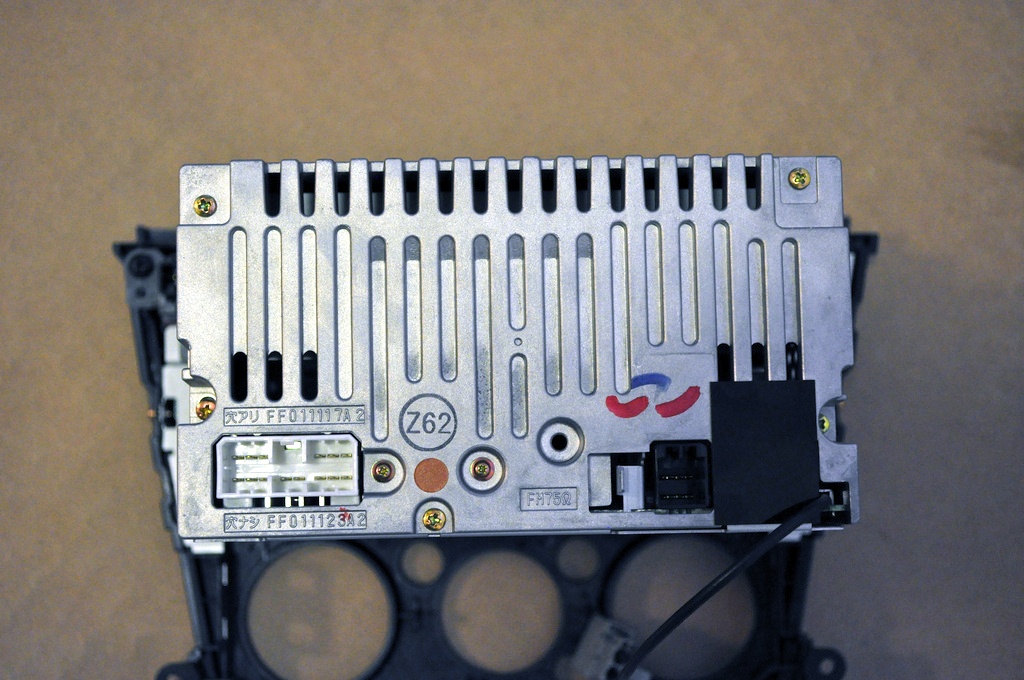
Back of the stereo, I mainly took these pictures so that I'd be able to see how it all went back together!
Model No. and other information.
Removing more screws

Front faceplate removed showing control/display circuit board.
More screws removed and CD ribbon disconnected and we can finally see the main circuit board.


I was inspired by a great post by Jordan found via Hack-a-Day about doing this to an older '04 Subaru stereo, it helped me locate the radio module and begin searching for the audio interface.


To find the Left and Right interface I hooked the mainboard and faceplate back up in the car and turned the radio on. A Zune was playing audio and hooked up to a couple wires via the 3.5mm interface below. I held the ground wire to the casing and touched each leg of the radio module with the audio out wire until I heard sweet crystal clear audio from the Zune coming out of the car speakers... well it was still mixed with the FM signal, but we'll fix that soon!

As you can see in the the above picture, I've used a sharpie on the two legs that output audio from the radio module to the mainboard, Red for Right and Blue for Left.

Underside of the mainboard at the radio module area. I did not see a good way to patch in here.


3.5mm interface
http://www.radioshack.com/product/index.jsp?productId=2103451#

Edit: Apparently the Radioshack link does not work, here is a similar product from Digikey:
http://www.digikey.com/product-detail/en/35RAPC4BH3/SC1464-ND/1288781

A good search to find it in other places is: "3.5mm switched jack stereo audio 5 contacts"

There are only 3 wires shown in this picture, but there will be 5 when it is finally installed.
Diagram of which audio wires connect to where.


The Left and Right radio output legs were carefully clipped and bent outwards.

Be extremely gentle and use a low heat solder to attach these two wires. I felt one of the legs loosen from the radio module when I was applying heat to it and I have no idea how hard it would be to reattach if it detached completely.

Important: It is not shown here, but I also soldered the ground wire to that blob of solder on top of the radio module.
The Aux input wires are soldered to the underside of the mainboard. I placed some electrical tape over the nearby capacitors and used hot glue to hold the wires in place.
The stereo re-assembled and ready for final soldering to connect 3.5mm jack. I marked the wires from the radio module with sharpie so I would be able to tell them apart. (I only had 3 colors of wire!) Also, may I draw your attention to the can tab which I used as a washer to hold the wires in place as they exit the main assembly :)
Everything ready to be put into the Subaru!
I hand drilled a hole for the 3.5mm jack into the back of the cubby above the stereo and quickly found out that the plastic there was just a bit too thick to fasten the jack. I had to use a 1/2" spade drill bit to carve out a circle of plastic from the front. I could have taken the entire cubby out and thinned it from the back if I wanted it to be a bit cleaner look.
Update: I recommend choosing a different location to put the plug, it is fairly tedious to insert the jack into the back of such a small compartment!


Everything works great! To use the Aux-In I just switch on the radio to FM. When the plug is inserted to the 3.5mm jack the radio audio cuts out and the audio from my device is played through the speakers instead.

Disclaimer: I am not responsible for any damage that arises from people attempting to replicate this hack, there are many things that could go wrong and I have not described every single step in detail. It is up to you to decide if you have the expertise to undertake this project.

Thanks to http://www.subaruoutback.org/forums/ for having a ton of info available while I was researching this project.

Cheers and good luck!!

Tuesday, June 7, 2011

Optiplex 740 Processor Upgrade

I have an Optiplex 740 "desktop" that I have successfully upgraded to a Quad Core 2.4GHz Phenom and would like to share the information I gathered with you, the internet. :)


I first had to determine was what type of socket it had so I would be able to choose a proper processor upgrade. I have a "YP696" motherboard. Apparently there are some 740s with 939 sockets out there, but most are AM2 sockets.  I'm not entirely sure whether I have an AM2 or an AM2+ socket - if I find out I'll update this. The AM2+ processors will work in an AM2 slot, just without the cores being individually powered and no Hypertransport 3.0.

The "YP696" motherboard is also an "enhanced" version which has 8MB of VRAM and can support up to a Phenom X4 9850 whereas the non-"enhanced" boards top out with 64x2 Brisbanes.

The "desktop" form factor also appears to only support 95 watt processors. Dell's larger "mini-tower" does support 125w though, so I'm not sure if it is a hard limitation or just recommended because the "desktop" PSU is less powerful than the "mini-tower." I decided not to chance it.

Another note about sockets, I did consider putting an AM3 CPU into the AM2 socket, they are fairly inexpensive and creep up above 3GHz, but for them to work the BIOS firmware needs to support AM3 and I could not find any reports of people putting these in Optiplex 740s and did not see any mention of AM3 support in the 740 firmware release notes.

With all of this information gathered I looked around for an AM2+ 95w Phenom x4 processor.  The one I finally decided to purchase was a refurbished AMD Phenom X4 9750 2.4GHz p/n: HD9750WCJ4BGH.  I would have gotten the 9850, but I could not find one for under $100, the refurb 9750 was only $72.

After I received the CPU the install went like so:
  • Disconnect everything
  • Open up the 740
  • Take off the heatsink/shroud combo
  • Clean the thermal paste off heatsink
  • Release ZIF socket lever
  • Carefully remove old 4400+ CPU
  • Carefully insert new 9750 CPU
  • Push ZIF socket lever back into position
  • Apply new thermal paste (Pea size drop of Arctic Silver, spread flat with credit card)
  • Reattach heatsink/shroud combo
  • Close 740 case
  • Reconnect everything
  • Push power button
  • Cross fingers!!! .. ... ...
  • ZOMG BOOT SCREEN YAY!
  • Press F2, look at processor info, WOOT! PHENOM!
I tested Brink, Minecraft and Just Cause 2 and they all ran significantly faster with Brink getting a steady 60+ fps whereas before the CPU upgrade I was lucky to hit 30.

I should also mention that I have installed a low profile nVidia 9600GT video card (Galaxy 96GFF6HVDCXX GeForce 9600 GT 512MB 256-bit DDR3 PCI Express 2.0 x16 HDCP Ready Low Profile) which has worked well so far, it's not too loud and even though I thought the PSU would be underpowered for this card I have had no issues at all!

In the end, this computer serves as a powerful and compact media center and gaming machine which is exactly what I wanted from it.

My hope is that others will be able to save time gathering information by reading this post.

If you have anything to add or see that something needs to be corrected please leave a comment and I will update this as soon as I can.

Cheers!

Tuesday, May 11, 2010

Amazing Generic Pudding Box Scans from 1990s

So a friend of mine was getting rid of a food cache and I found some great vintage pudding boxes expiring in 1997 and 1998!!

I scanned them in at 600dpi using my crap HP "multifunction" device which is currently only able to scan, the PNGs were fucking huge so I made them into jpegs.
On with the show...

First up we have HY*TOP premium quality Lime Flavor Gelatin Dessert!!!

Feast your eyes because back in '94 you could get these for 50 cents... each!
I really like lime stuff.

It's astounding:


Next is a really obscure rarity. I'll bet nobody has ever collected this one.

Could you believe Food Club SENSIBLES FAT FREE pudding & pie filling Instant Vanilla Artificial Flavor!!!!???


I really like how the "I" in Sensibles is smaller, it really shows how much thought was put into this line of generic pudding.
This looks like it expired 08 19 98, it was also produced in skokie, illinois... just like those Quartet whiteboards.

So yeah, I have these original boxes available until this thursday when the recycling truck will pick them up. [update: gone]

Lucid Indicator Applet Fail

Yeah, so I've been using Ubuntu : Lucid Lynx super cat farnsworth edition for a while now and am really liking it. hahah wait... what the HOEK are these goofy icons I can't get rid of???!!!!

I'm talking about the envelope and the little speech bubble with an X on it.

I am free from my operating system!! I don't want to update my status or check my e-mail using my OS but this is exactly what is built in to Ubuntu 10.04 from the start.


Much to my chagrin I was unable to simply right-click and "remove from panel" these icons explicitly. They both belong to individual icon pairs called "indicator applet" and "indicator applet session"

I just want to keep the volume indicator and the power/logoff indicator icons but I cannot!! WHY DO YOU TORTURE ME SO UBUNTU?


After some intense searching I found out that it is indeed possible to remove these individually using the System>Administration>Synaptic Package Manager to uninstall the "indicator-me" and "indicator-messages" packages. Look... see how mine aren't green anymore... that's because I nullified their existence :)


So seriously. This wasn't that difficult to figure out but I really shouldn't have to figure out anything besides right clicking on what I don't want and getting rid of it.

Look how happy my menu bar is now!! I have room for Eyes 2.30.0 now without that terrible soul sucking feeling of not having updated my status recently enough or thinking about my e-mail piling up.

Yay!

Thursday, October 15, 2009

AutoCAD DWG Trueview 2010 OSnap fix

I am pretty happy about Autodesk releasing DWG Trueview because I can finally convert those pesky 2009 drawings down to 2004 format with ease!

So I started recommending it as a DWG viewer to my co-workers. Great! Then Autodesk went one step further and enabled the measurement tools in it!!! Success, now I don't have to compute areas for all these people!! Only one thing wrong... they have hampered the effectiveness of these tools by providing no visible way permanently TURN OFF OSNAP besides clicking on the "snap none" or _NON button every time. This problem is compounded by the fact that you cannot snap to non co-planar points when computing a 2d area. Sooo many plans have different 2D items at different elevations due to bad drafting or conversions from 3D that this cripples the effectiveness of the area tool.

So I set about to find a way to set OSMODE to 0 and let me choose when I want to osnap it up by clicking the buttons.

After poring through the files in the install directory and doing a bunch of googling I found that the osmode default variable resides in the registry, yay!! Changed the entry to "0000" and BAM! no more stupid unwanted snaps!


Here are the steps to disable OSNAP:

Jump into the registry editor using Start-Run-regedit (the registry editor is a powerful tool, don't change or delete values unless you know what you are doing!)

Navigate to:
HKEY_CURRENT_USER\Software\Autodesk\DWG TrueView\R7\DWGVIEWR-8001:409\Profiles\<>\General

Right click on the Osmode REG_DWORD and choose "Modify"

Change the value data from "1025" to "0"

Close the registry editor and load up TrueView!!

This should work with DWG Trueview 2009 as well, just replace R7 with R6 in the registry path.


Also, I found out that you can use Ctrl-V to paste certain commands into the commandline, alas OSMODE is not supported... here is a link to some of the ones that do work: http://rkmcswain.blogspot.com/2008/10/dwg-trueview-hidden-commands.html

Friday, February 6, 2009

Birthday


On which I am presented a delicious pina colada cake.

Monday, January 26, 2009

Glamaris bacon, teh


Glamaris bacon, teh, originally uploaded by MarkaroniMc.

Glamaris bacon, teh

Saturday, January 24, 2009

Wacom Intuos Pen GP300E Disassembly

I went to use my Intuos tablet and found out that my Wacom pen is f'd up, it acts like it is always in the "clicked" position, the tip sensitivity still worked but it couldn't detect if the tip was being "clicked". The utility said that Button 1 was constantly ON, and only when I rapped it on the side would it flicker off just to come back on. So... $50 bucks for a replacement? I might as well try to fix it myself...

Sooo I wrangled and pushed and pried to no avail, then... I bent more and more and more and... Snap!

Damn, there was a long circuit board in there that snapped with the plastic housing.

Anyway, this is how it should have slid apart, maybe if you pushed on the eraser end to help a bit it may come out easier. I really did try pulling the thing apart, just not hard enough I guess.

Update from commenter [alcomposer]:  "When I took mine apart, I simply held it with both hands, and pushed my thumbs together and slowly pulled it apart."


My hope is that somebody will stumble on this page if they are trying to get their stylus pen apart and do it the right way.


Update from commenter [Chad von Nau]:

Thanks to everyone on here who posted tips, I wouldn't have been able to take my pen apart otherwise. Here's what it looks like disassembled with the circuit board in one piece:


I had the same problem where the pen was always registering a click. Thwacking it on my palm would fix it temporarily and eraser side still worked fine, so I knew it had to be something with the pen. It took me a few hours to get it apart. I started with full strength two handed pulling. I also tried pressing my thumbs against each other like alcomposer suggested. What seemed to work best was moderate strength pulling while _gently_ rocking back and forth. While I was doing this, I kept hearing worrisome clicking/cracking noises, but it was OK in the end.

Once I got it open, I pulled the nib out and gently took the magnet out of its cradle. I swabbed the inside with rubbing alcohol on the tip of a paper towel. Then I put the nib in without the magnet and spun it around so that its receiver assembly also spun around. There was less resistance after a few rotations, so I think I was able to unstick something with that.

Putting it back together was easy enough except for the eraser spring. You can see how small it is in the top right of the photo. Searching for that on my carpeted floor added an hour to the process.

The pen seems OK now. If the problem returns, I have one last idea. The pen has two nib receiver assemblies, one for the pen and one for the eraser. They are the yellow parts in the photo. I suspect that swapping these would move the perma-click problem to the eraser end, which is less critical for me. I was unable to get them out when I tried this time, and they have what look like rather breakable plastic clips, so I hope I don't have to try it.

---

So my first repair attempt (see previous comment) was unsuccessful. The pen reverted to it's perma-click behavior within a day. I made another repair attempt, this time I swapped the parts that I'm calling the receiver assemblies. Opening the pen only took a minute this time, a combination of confidence and loosening caused by the original repair.

Swapping the receiver assemblies wasn't as difficult as I thought, the trick was using point tipped tweezers (I used this one http://www.amazon.com/dp/B0006SIPIK). I started with the pen tip assembly first. If you place the tweezer tips in the corners where the ends of white clip meet the lip of the yellow receiver assembly, farthest from the circuit board, you can apply pressure outward and up which will release one side of the clip. Repeat this on the rear side of the same clip. Once you release the clip, the yellow assembly should slide out easily. Underneath the assembly, there are three small disks. The top one is rubbery and will probably have an inward indentation if your pen is as used as mine. The middle disk is a washer made out some kind of brown mylar material. The bottom disk is thick and metallic. It has a smaller inset piece of metal on it's bottom side. Carefully remove these and place them aside. It's handy to have a Q-tip around and this point so you can clean off any debris from the disks and so you can move them around without getting your finger oils on them. I repeated this process on the eraser side. Here's a photo of everything disassembled:


Finally, each piece I removed from the pen tip side was installed on the eraser side, and vice versa, being careful to orient the disks in the way that they had originally been installed. Put the pen back together and done.

So far so good. My hope is that whatever wear that causes the perma-click behavior is now isolated to the eraser side. I will report back if it goes south again.
---

Thanks for letting me copy your info to the main portion of the post Chad, stuff seems to live longer on the internet when it's in a few different places :)

w580i video player fast forward

I posted this over at http://www.topsony.com/forum/mobile-phones-f4/w580i-video-controls-t14025.html


Since I had this question too I figure it's good to spread the answer far and wide for teh good of the intarnets.

To Fast Forward video on the w580i using the included video player in portrait mode just hold down right on the directional pad, the button that has >> on it, hold down left (<<) to rewind. You can see the time go by in the bar at the top and let go when you get to the correct minute:second.

When you are in landscape mode you hold down the down button to fast forward and you hold down the up button to rewind..

Sony assumes you have turned the phone on it's side when you use landscape mode, that's why the FF button changes. Also, you don't have the nice bar to indicate the time position as you are fast forwarding so you have to just guess when to stop holding the button or switch back to portrait mode to fast forward or rewind.


w580i video player controls FF RW fast forward

Friday, January 16, 2009

teh fogs


teh fogs, originally uploaded by MarkaroniMc.

It's teh fogs. i almost missed my second bus too but the mini mini was employed quickly and i raced up and parked a stop ahead of my express chariot. Through the mist we travelled downtown, the duwamish looked muddy from the apex of the bridge. I just miss the bus to work from 4th and union and snap this building disappearing into the sky.

Hal statue


Hal statue, originally uploaded by MarkaroniMc.

The first time i've seen light after work *all year* 5pm approx

Wednesday, January 7, 2009

Confused corner

I'm at the corner of 44th and 44th and 43rd

Sunday, April 13, 2008

Word is dumb


Word can go fuck itself. When did it start thinking it needed more of my measly computing resources than Photoshop? Seriously, I took the screenshot, clicked OK on this box and opened Photoshop CS3 and pasted the screenshot into it. Ridiculous.

Thursday, April 10, 2008

Romantic Barnacles

Two barnacles that I found on the beach and put in the tide pool together and their little tongues came out and they have romantic kiss together.

all the entries

Mastodon